We started this project off by getting a 4x4 plank of wood and adding support bases to the bottom of it so it could support itself and stand. Then, we decided on what we wanted our project to accomplish in the Rube Goldberg. Our first idea was catching a pokemon, then our second one was pressing an easy button and finally we ended up going with our presentation for our slide show. We then began brainstorming ideas on what and how it should look like, but in the end, we decided to work on our own little blueprints and combine them all together when we were done. In the project, we used 5 out of the 6 simple machines which were a lever, wedge, pulley, inclined plane, wheel and axle. We didn't include a screw because we couldn't find space for it. In the project we had to find the Force, Mass, Acceleration, Mechanical Advantage, Potential Energy, and more. All these things were the calculations needed to complete our presentation.
Over the next four weeks we were working hard on our Rube Goldberg. All our tools were generously supplied by STEM. Some of the tools we used were drills, saws, glue guns, nails, screws, etc. We did a lot of building over the four weeks, but we only had 3 days a week to actually build the project. It averages to about 48 hours and about 7 hours out of school.
Simple Machines
Lever: Levers can be used to exert a large force over a small distance at one end by exerting only a small force over a greater distance at the other.
Wedge: Cross-section of a splitting wedge with its length oriented vertically. A downward force produces forces perpendicular to its inclined surfaces.
Pulley: A pulley is a wheel on an axle that is designed to support movement of a cable or belt along its circumference.
Inclined Plane:An inclined plane is a flat supporting surface tilted at an angle, with one end higher than the other, used as an aid for raising or lowering a load.
Wheel and Axle:The wheel and axle is generally considered to be a wheel attached to an axle so that these two parts rotate together in which a force is transferred from one to the other. In this configuration a hinge, or bearing, supports the rotation of the axle.
Screw: A screw is a mechanism that converts rotational motion to linear motion, and a torque (rotational force) to a linear force.
Mechanical Advantage:A measure of the force amplification achieved by using a tool, mechanical device or machine system. Ideally, the device preserves the input power and simply trades off forces against movement to obtain a desired amplification in the output force.
Potential Energy: Is the energy of an object or a system due to the position of the body or the arrangement of the particles of the system.
Some Formulas Used:
Force: F=MA
Acceleration: A=V/T
Work: W=FD
Mechanical Advantage: MA=ID/OD
Potential Energy:PE=mgh
In order to use these formulas, we had to know what each thing meant and how we could use it in our Rube Goldberg in order for it to help us. We had to understand what Mechanical Advantage was. The formula we used was Input Distance divided by Output Distance and that Potential Energy meant the Mass times the gravity times the height. Also, we had to know gravity is 9.8m/s which is also acceleration to. Another formula we learned would be Force. Force is mass times the acceleration of the object which would be 9.8m/s.
Physics Used in Our Project
Step 1: Marble Track
F=MA M=0.005kg A=9.8m/s F=0.049N PE=mgh m=0.0125kg g=9.8m/s h=0.285m PE=0.0349J
Step 2: Spoon Lever
MA= ID/OD ID=7.8cm OD=10.65cm MA=0.73
Energy is transferred from marble through spoon to domino
Step 3: Domino
F=MA M=0.01252kg A=9.8m/s F=0.122696N
Energy transferred is from domino to domino to soccer ball
Step 4: First Soccer Ball Incline Plane
MA=ID/OD ID=39.2cm OD=10cm MA=3.92 PE=mgh M=0.0258kg G=9.8m/s H=0.135m PE=0.02528J
Step 5: Second Soccer Ball Inclined Plane
MA=ID/OD ID-19.5cm OD=13.5cm MA=1.4 PE=mgh M=0.0258kg G=9.8m/s H=0.135m PE=0.34J
Step 6: Soccer Ball Pulley
MA of Pulley=1
Energy is transferred from the soccer ball through the pulley to the weight
Step 7: Bridge Lever
MA=ID/OD ID=72cm OD=10.6cm MA=1.13
Energy is transferred from weight through lever to weight.
Step 8: Wheel and Axle
MA=ID/OD ID=3cm OD=2cm MA=1.5
Energy is transferred from weight through wheel and axle to scissors
Step 9: Scissors
MA=ID/OD MA=9cm OD=3.5cm MA=1.06
Energy is transferred from wheel and axle through scissors to string
Step 10: Hard Hat Lever
MA=ID/OD ID=6cm OD=9.5cm MA=0.672
Energy is transferred from weight to lever
Step 11:Marble Drop Lever
MA=ID/OD ID=2.5cm OD=2.5cm MA=1
Energy is transferred from hardhat leverthrough marble drop lever to marble
Step 12:Inclined Plane Tube
MA=ID/OD ID=36.5cm OD=15.5cm MA=2.32
Step 13:Marble Pulley
MA of Pulley=1
Energy is transferred from marble through pulley through weight to car
Step 14:Car Incline Plane
MA=ID/OD ID=26.5cm OD=51cm MA=2.94
Step 15: Incline Plane Golf Ball
MA=ID/OD ID=60.5cm OD=51cm MA=1.19
Step 16: Weight Pulley
MA of the Pulley= 1
Engineering Design Cycle
1. Identify the Need Found out we needed to construct
2.Research the Problem What type of things do we need for our Rubegoldburg
3.Develop Possible Solution Thinking about different things to solve
4.Select Most Promising Solution Picking the Presentation for our Project to solve
5.Construct a Prototype. Make Blueprint and Build
6.Test and Evaluate Prototype See if it works
7.Communicate the Design Show the design to others
8.Redesign Make it better
Knowledge Behind All This
As you guys all know, the equations and formulas didn't come to us naturally. In order to obtain all this knowledge, we spent the prior two weeks in between the project learning about the different types of physics and how these work. Some labs we had to do in order to learn about it and further understand it were the energy lab, the lever lab, the lever lab 2, and the pulley lab. Through these process, we discovered there could never really be true answers because we don't live in a perfect world with no friction, air resistance, and etc...
Goal and Design
When we started this project, we came up with 3 main cases we wanted to solve. Those ideas were catching a pokemon, starting a slideshow, and pressing an easy button. As you know, we picked the slide show because we thought it was the most reasonable one of the three. Then we got to the part of the project in which we had to come up and design a blueprint for our project. At first, we started working as a group and we started throwing out ideas on how we should start this project and how it should be built. But the only problem was that we couldn't settle on a way to start this project so we began drawing one out. We decided to split up and start creating our own and then compare and combine ours when we were done. That ended up working really well because we were all able to put our Ideas in and help out. After we were done, we designated people in our group to bring different materials so we could start our Rube Goldberg. The next day, we were handed a 4x4 piece of plywood and we started building right away. As we were building, we had to add and remove parts of our project in order for it to work to its fullest potential.
Things We Could of Improved On
I think some of the stuff we could of improved on were making sure one person didn't do too much work on the project while the others couldn't contribute as much. That was one of the bigger problems we faced. Another problem would be communication. I built a ramp for one of our parts on the blueprint but then one of our group members decided that they didn't want to include it in the project. We fixed it in the end.
Problems in Building the Project
Most of the problems in our construction of the project were the wheel and axle, pressing the button on to start the slideshow, and having the marble always role through the pipe. The problem we had for the wheel and axle were getting the scissors to cut the string to release the weight onto the lever. In order to make this step work, we had to put a block of wood in the way with a notch in it so it would cut the string at the right angle for the scissors. Then for the slideshow part, we installed an extra pulley so that we could put a water-bottle filled with sand to release the pressure sensitive pad. Finally for the marble part, we had the problem of the marble sometimes getting stuck in the pipe on the way down. We fixed that by putting an extra marble where the old one was so it wouldn't get stuck. That assured us of our 100% success rate. Another thing were the barricades for the parts of the project that would bounce out while needing to complete our task.
Thing We Did Good on
Some of the things we did good on were the creativity and getting all the steps to intertwine and work in an orderly fashion. It was a great experience and I think we'll do even better next time.
Our Rube Goldberg
Sorry about the one mistake.
Over the next four weeks we were working hard on our Rube Goldberg. All our tools were generously supplied by STEM. Some of the tools we used were drills, saws, glue guns, nails, screws, etc. We did a lot of building over the four weeks, but we only had 3 days a week to actually build the project. It averages to about 48 hours and about 7 hours out of school.
Simple Machines
Lever: Levers can be used to exert a large force over a small distance at one end by exerting only a small force over a greater distance at the other.
Wedge: Cross-section of a splitting wedge with its length oriented vertically. A downward force produces forces perpendicular to its inclined surfaces.
Pulley: A pulley is a wheel on an axle that is designed to support movement of a cable or belt along its circumference.
Inclined Plane:An inclined plane is a flat supporting surface tilted at an angle, with one end higher than the other, used as an aid for raising or lowering a load.
Wheel and Axle:The wheel and axle is generally considered to be a wheel attached to an axle so that these two parts rotate together in which a force is transferred from one to the other. In this configuration a hinge, or bearing, supports the rotation of the axle.
Screw: A screw is a mechanism that converts rotational motion to linear motion, and a torque (rotational force) to a linear force.
Mechanical Advantage:A measure of the force amplification achieved by using a tool, mechanical device or machine system. Ideally, the device preserves the input power and simply trades off forces against movement to obtain a desired amplification in the output force.
Potential Energy: Is the energy of an object or a system due to the position of the body or the arrangement of the particles of the system.
Some Formulas Used:
Force: F=MA
Acceleration: A=V/T
Work: W=FD
Mechanical Advantage: MA=ID/OD
Potential Energy:PE=mgh
In order to use these formulas, we had to know what each thing meant and how we could use it in our Rube Goldberg in order for it to help us. We had to understand what Mechanical Advantage was. The formula we used was Input Distance divided by Output Distance and that Potential Energy meant the Mass times the gravity times the height. Also, we had to know gravity is 9.8m/s which is also acceleration to. Another formula we learned would be Force. Force is mass times the acceleration of the object which would be 9.8m/s.
Physics Used in Our Project
Step 1: Marble Track
F=MA M=0.005kg A=9.8m/s F=0.049N PE=mgh m=0.0125kg g=9.8m/s h=0.285m PE=0.0349J
Step 2: Spoon Lever
MA= ID/OD ID=7.8cm OD=10.65cm MA=0.73
Energy is transferred from marble through spoon to domino
Step 3: Domino
F=MA M=0.01252kg A=9.8m/s F=0.122696N
Energy transferred is from domino to domino to soccer ball
Step 4: First Soccer Ball Incline Plane
MA=ID/OD ID=39.2cm OD=10cm MA=3.92 PE=mgh M=0.0258kg G=9.8m/s H=0.135m PE=0.02528J
Step 5: Second Soccer Ball Inclined Plane
MA=ID/OD ID-19.5cm OD=13.5cm MA=1.4 PE=mgh M=0.0258kg G=9.8m/s H=0.135m PE=0.34J
Step 6: Soccer Ball Pulley
MA of Pulley=1
Energy is transferred from the soccer ball through the pulley to the weight
Step 7: Bridge Lever
MA=ID/OD ID=72cm OD=10.6cm MA=1.13
Energy is transferred from weight through lever to weight.
Step 8: Wheel and Axle
MA=ID/OD ID=3cm OD=2cm MA=1.5
Energy is transferred from weight through wheel and axle to scissors
Step 9: Scissors
MA=ID/OD MA=9cm OD=3.5cm MA=1.06
Energy is transferred from wheel and axle through scissors to string
Step 10: Hard Hat Lever
MA=ID/OD ID=6cm OD=9.5cm MA=0.672
Energy is transferred from weight to lever
Step 11:Marble Drop Lever
MA=ID/OD ID=2.5cm OD=2.5cm MA=1
Energy is transferred from hardhat leverthrough marble drop lever to marble
Step 12:Inclined Plane Tube
MA=ID/OD ID=36.5cm OD=15.5cm MA=2.32
Step 13:Marble Pulley
MA of Pulley=1
Energy is transferred from marble through pulley through weight to car
Step 14:Car Incline Plane
MA=ID/OD ID=26.5cm OD=51cm MA=2.94
Step 15: Incline Plane Golf Ball
MA=ID/OD ID=60.5cm OD=51cm MA=1.19
Step 16: Weight Pulley
MA of the Pulley= 1
Engineering Design Cycle
1. Identify the Need Found out we needed to construct
2.Research the Problem What type of things do we need for our Rubegoldburg
3.Develop Possible Solution Thinking about different things to solve
4.Select Most Promising Solution Picking the Presentation for our Project to solve
5.Construct a Prototype. Make Blueprint and Build
6.Test and Evaluate Prototype See if it works
7.Communicate the Design Show the design to others
8.Redesign Make it better
Knowledge Behind All This
As you guys all know, the equations and formulas didn't come to us naturally. In order to obtain all this knowledge, we spent the prior two weeks in between the project learning about the different types of physics and how these work. Some labs we had to do in order to learn about it and further understand it were the energy lab, the lever lab, the lever lab 2, and the pulley lab. Through these process, we discovered there could never really be true answers because we don't live in a perfect world with no friction, air resistance, and etc...
Goal and Design
When we started this project, we came up with 3 main cases we wanted to solve. Those ideas were catching a pokemon, starting a slideshow, and pressing an easy button. As you know, we picked the slide show because we thought it was the most reasonable one of the three. Then we got to the part of the project in which we had to come up and design a blueprint for our project. At first, we started working as a group and we started throwing out ideas on how we should start this project and how it should be built. But the only problem was that we couldn't settle on a way to start this project so we began drawing one out. We decided to split up and start creating our own and then compare and combine ours when we were done. That ended up working really well because we were all able to put our Ideas in and help out. After we were done, we designated people in our group to bring different materials so we could start our Rube Goldberg. The next day, we were handed a 4x4 piece of plywood and we started building right away. As we were building, we had to add and remove parts of our project in order for it to work to its fullest potential.
Things We Could of Improved On
I think some of the stuff we could of improved on were making sure one person didn't do too much work on the project while the others couldn't contribute as much. That was one of the bigger problems we faced. Another problem would be communication. I built a ramp for one of our parts on the blueprint but then one of our group members decided that they didn't want to include it in the project. We fixed it in the end.
Problems in Building the Project
Most of the problems in our construction of the project were the wheel and axle, pressing the button on to start the slideshow, and having the marble always role through the pipe. The problem we had for the wheel and axle were getting the scissors to cut the string to release the weight onto the lever. In order to make this step work, we had to put a block of wood in the way with a notch in it so it would cut the string at the right angle for the scissors. Then for the slideshow part, we installed an extra pulley so that we could put a water-bottle filled with sand to release the pressure sensitive pad. Finally for the marble part, we had the problem of the marble sometimes getting stuck in the pipe on the way down. We fixed that by putting an extra marble where the old one was so it wouldn't get stuck. That assured us of our 100% success rate. Another thing were the barricades for the parts of the project that would bounce out while needing to complete our task.
Thing We Did Good on
Some of the things we did good on were the creativity and getting all the steps to intertwine and work in an orderly fashion. It was a great experience and I think we'll do even better next time.
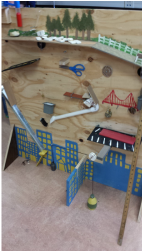
Our Rube Goldberg
Sorry about the one mistake.
| rube_goldberg_machine.pdf |
Schematic above
Link to Slideshows
http://jvwaltersstem.weebly.com/rube-goldberg-machine.html
http://mcweinstockstem.weebly.com/rube-goldberg.html
Sites Used
http://en.wikipedia.org/wiki/Screw_(simple_machine)
http://en.wikipedia.org/wiki/Lever
http://en.wikipedia.org/wiki/Wheel_and_axle
http://en.wikipedia.org/wiki/Pulley
http://en.wikipedia.org/wiki/Inclined_plane
http://en.wikipedia.org/wiki/Wedge_(mechanical_device)
http://en.wikipedia.org/wiki/Mechanical_advantage
http://en.wikipedia.org/wiki/Potential_energy
